
Tour Diving Packing List, part 2

Pack It Up, Pack It In
The soft goods, electronics, and tools for my Tour Divide
This is the second entry of a two part series on packing for Tour Divide. This entry begins by listing the bags I chose and continues by listing the items in which I packed each bag.
The first post is about the hardware related to the bike itself. Check that entry out here.
You know packing is an important part of bikepacking because it represents 64% of it. (Seven letters divided by eleven in total… get it?!) The packing aspect of bikepacking is a game of tinkering. You’ll be deciding what you want right up to the very last minute of your trip. In fact, once you’ve begun, you’ll probably continue to critique your packing, maybe ditching or mailing stuff home plus acquiring new things along the way! I worked through different bag options for the better part of nine months and got my hands on the frame bag I used literally less than one week before departure. Packing is a process, not a destination.
The Bags:
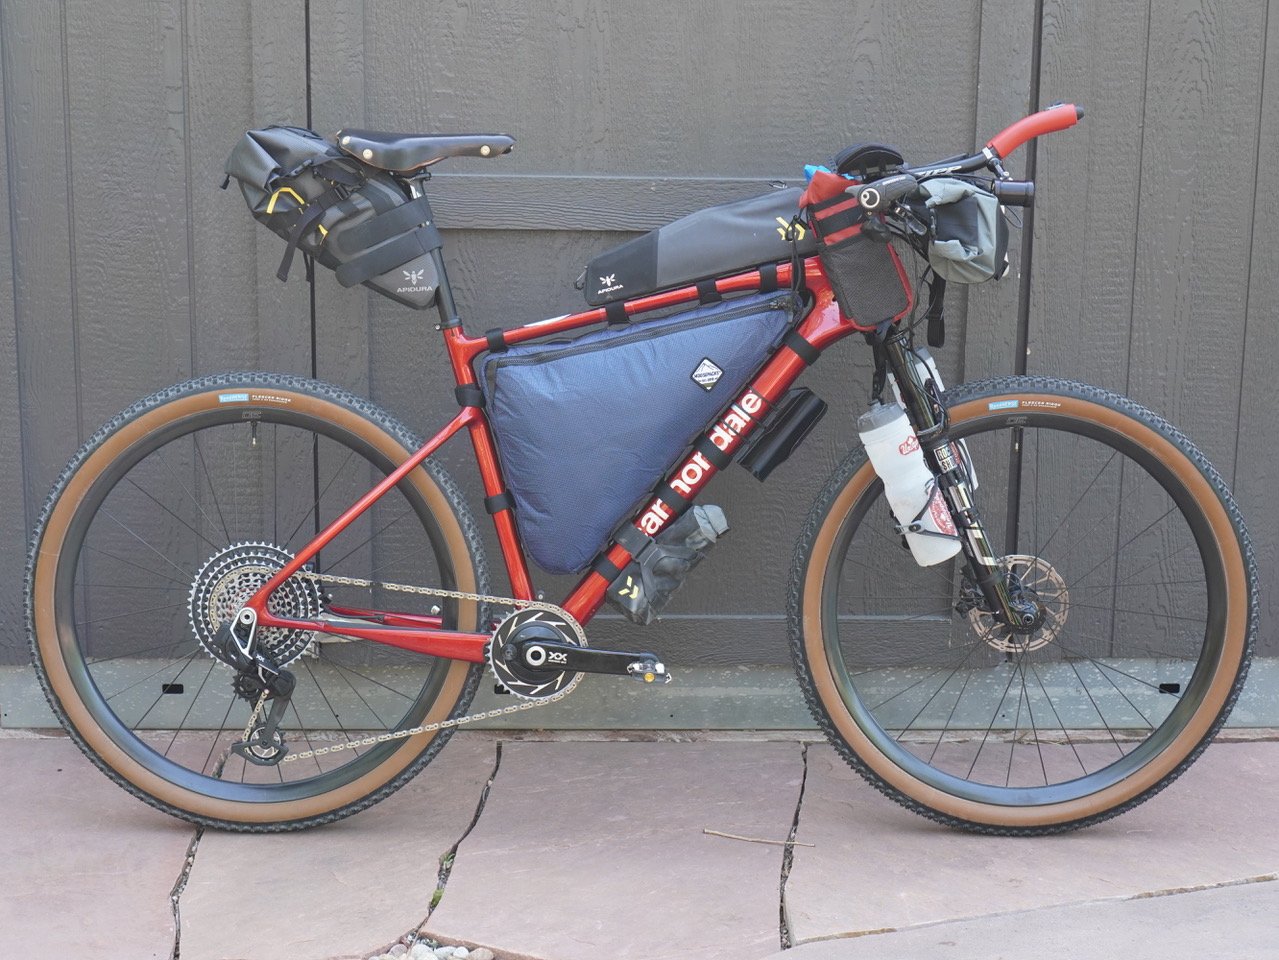
Apidura is a trusted name in bikepacking bags. They’re industrial and rugged, but offer hundreds of options to mix and match to your precise needs. They’re a UK brand and therefore know a thing or two about wet weather riding. Keeping your stuff dry is a massive priority on the Divide.
I went with their 14L saddlebag. Just call me Goldilocks because this size was just right. Allow me to state the obvious: the 14L bag offers more than the 9L option and less than Apidura’s 17L option. The 14L provides just the right amount of space I needed for my sleep system. Keeping a saddlebag and its contents lightweight is highly recommended, so that it’s not swinging side to side with every pedal stroke.
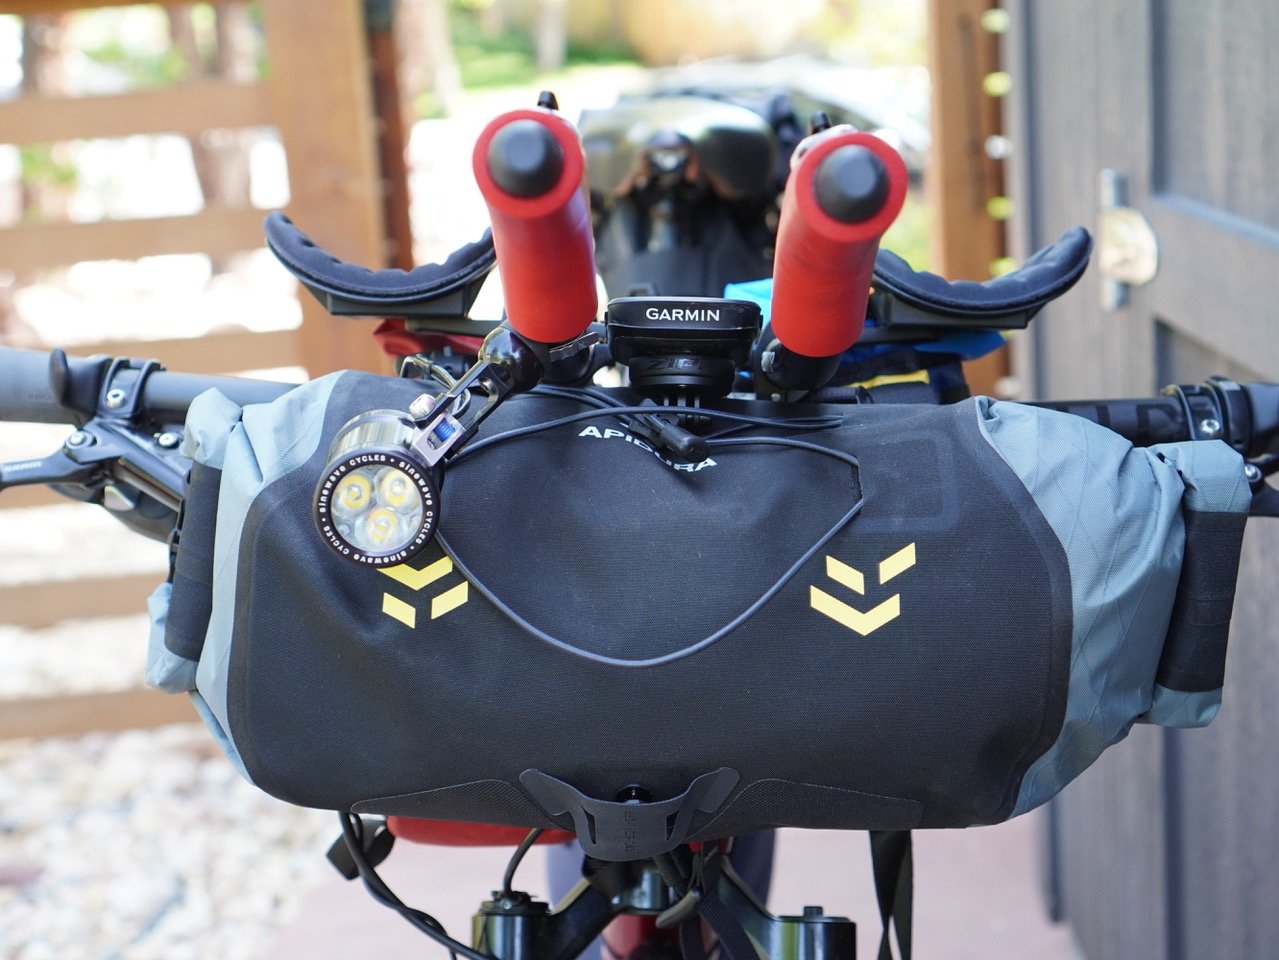
Jumping to the bow of this boat, I went with an Apidura 9L Handlebar Pack. In my experience, bags are like a storage unit — if you have the space, you’re going to fill it. So keeping a cap on things seemed wise and between the two options here, 9L and 14L, I opted down to the nine.
I chose to put more bags on my bike and disperse the weight rather than put all the weight in just a few spaces. I had a toptube bag for all sorts of easy-to-access accessories and the Apidura Long Top Tube Pack is one of the cooler bags out there. With a few different adjustable compartments and strapped securely in place with lots of support from the inventor of Velcro, this is a winner.
The Downtube Pack is a pretty handy one too. Dropping weight to the lowest position possible on the bike helps with stability rather than being top-heavy.

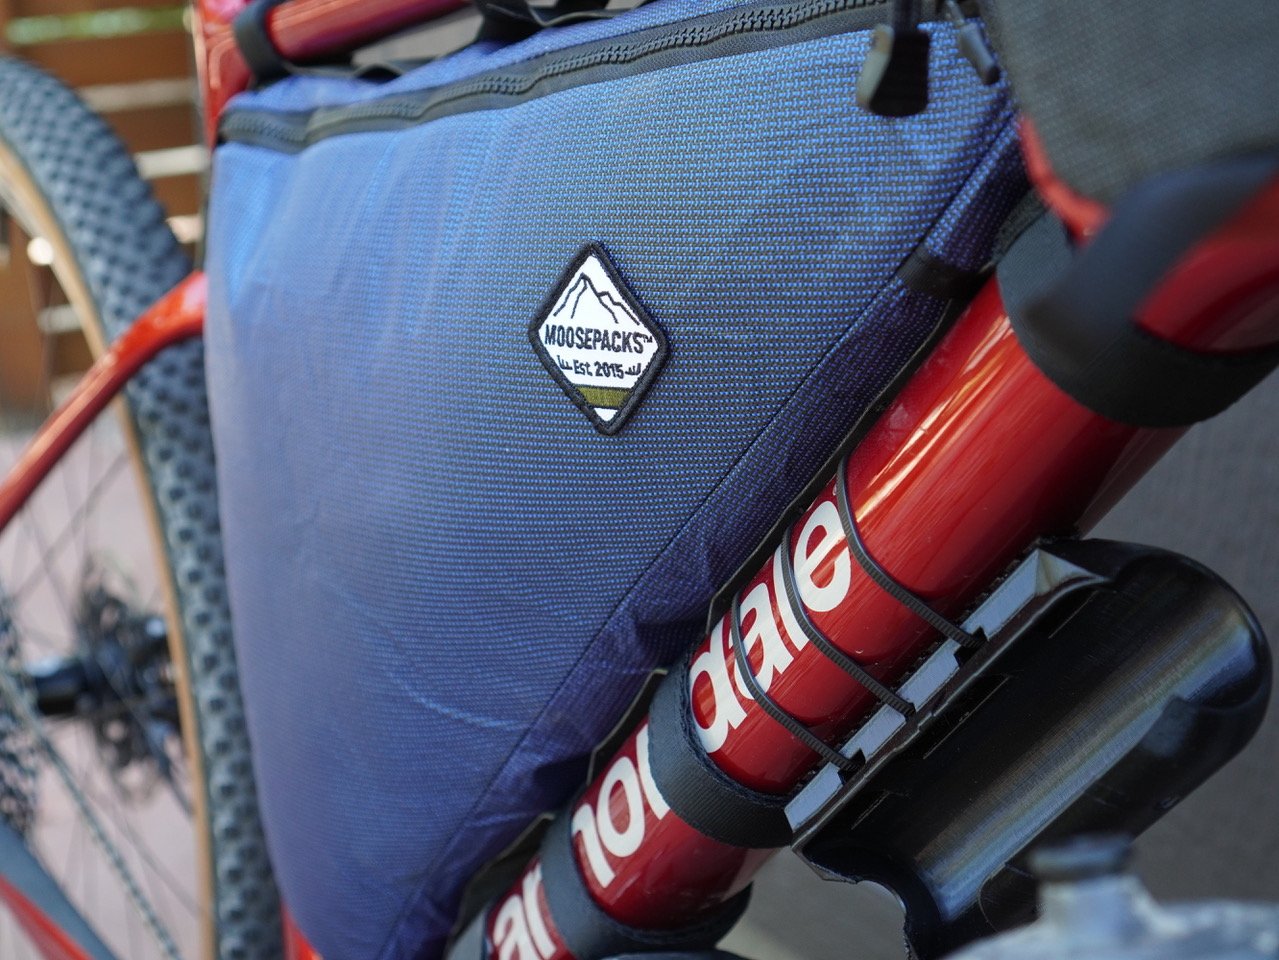
The frame bag is the crown jewel of bags. It stores all your main loot. You want it to store a lot, but not be something you think about. You’ll think about it if it’s doing something incorrectly like knocking your knees (i.e. too wide) or doesn’t fit the frame well (i.e. incorrect dimensions, especially if you had an odd shaped front triangle). My friend Matt Moosa of Moosepacks designed this bag with a priority on perfect fit and waterproofness. I didn’t think of the bag and that’s a testament to it doing its job. Admittedly, I thought it was too narrow when I first got my hands on it one week before departure, but it expands well to accommodate just the right amount of stuff I jelly-jammed into it.
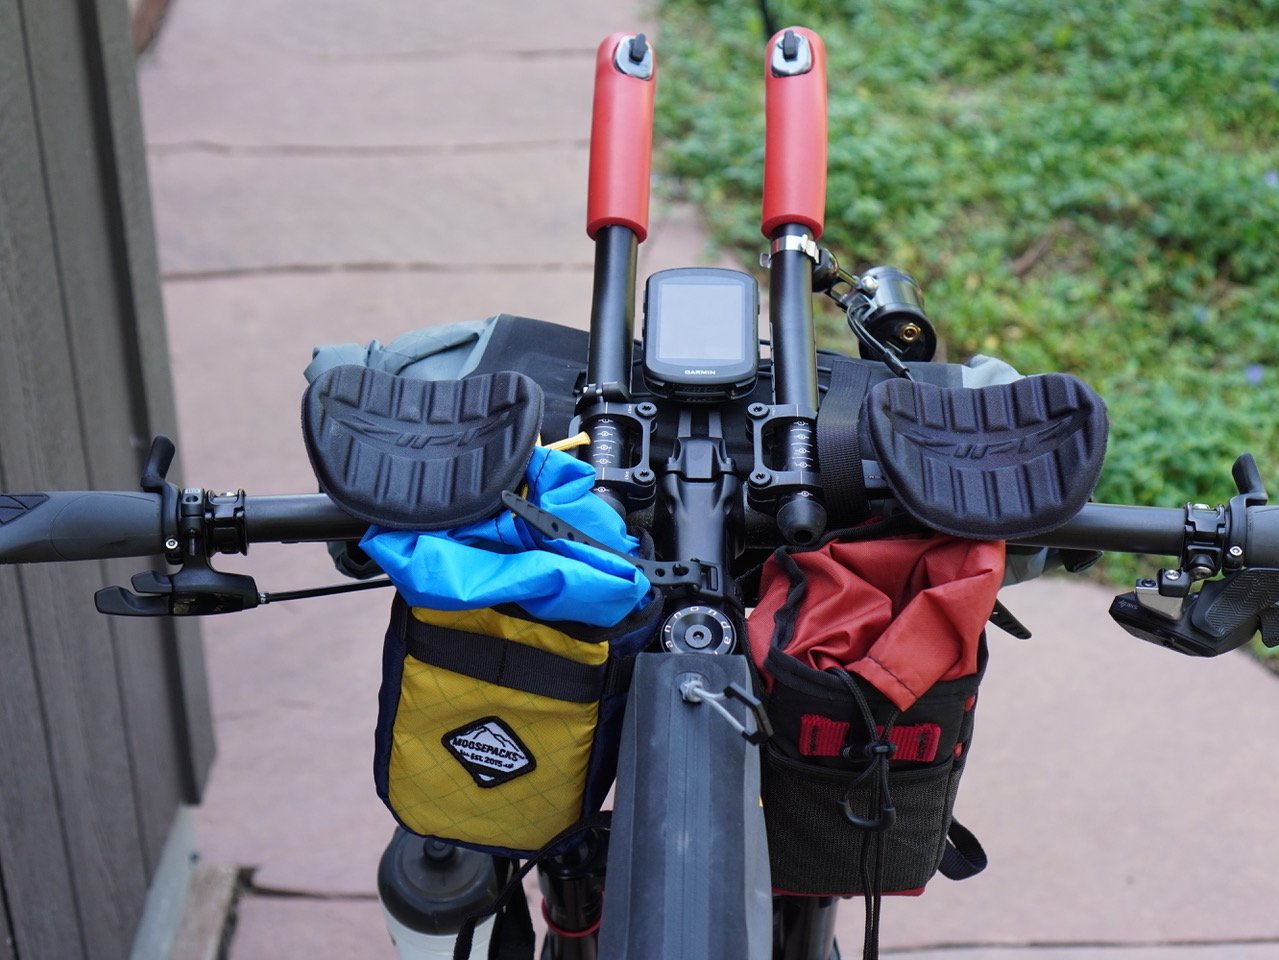
Revelate Designs is another popular option in bikepacking bags. Their Feedbag has become a standard option for stem bags, offering quick access to electronics, food, tools, and so forth. It’s hard to describe how handy it is to have a friend like Matt of Moosepacks. I sent him a link to the Revelate Feedbag and asked him to make something similar. Within days it was created in his studio and on my doorstep. That’s the red bag you see on the right, below. With both cinched central storage and lots of side pockets with elastic retention, I used every cubic inch of this bad dog.
The blue-yellow bag on the left is similar, but is actually a few months older. I asked Matt to help create a bag that would hold a GoPro for easy deployment to snap video on the fly. You can see the rectangular shape, the perfect fit a GoPro. It also works well in this Feedbag-like format. Needless to say Matt is awesome and if you ask politely, he can probably make you something super cool too.
Doing some quick math, that’s 14L + 9L + 1.8L + 1.8L + 12L + 1.8L + 1.8L = 42.2 liters of storage. When I think of liters, I think of a 2 liter bottle of soda. Soooo roughly 21 two liter bottles…?! That’s such an ambiguous measurement so as to be comical.
Furthermore that sounds generous but as I mentioned previously, you’ll cram stuff in every nook and cranny, regardless of how much room you’ve got.
WHAT’s In The Bags:
In my saddlebag…

Seen left to right, above, let’s start with the Outdoor Research Helium Bivy. I do get a kick out of the reviews of this bivy. The pros praise that it is waterproof. The cons deride that it is not waterproof. I never had to use this bivy in a downpour but in all the conditions in which I’ve used it, I’ve stayed dry. The Helium Bivy is light, doesn’t feel like you’re in a sauna, and collapses down pretty tightly and easily. I’m a fan.
In the center, above, is the Sea to Summit Ultralight Sleeping Pad. It does what it’s advertised to do. That is, be quite light and lift you up off the ground in a comfy pad-like fashion. Check and check. I looked at other brands and other pads within S2S’s range, but ultimately thought this worked best for me. I’m a fan.
On the right there, despite not being in the bag itself but I did bring it along with me, is the Sea to Summit Ultralight Spark Sleeping Bag. It ain’t cheap, but in a pinch it’ll keep you alive in cold temperatures. Admittedly, it was balmy on this year’s route so it’s not like we were frigid. But cold, snowy conditions can exist in the Rockies and I talked to a friend who was cold in his 40 degree bag, so I went with the 28 degree option and think it’s a keeper.
Not seen is the Sea to Summit Ultralight Pillow. Do you see a trend here? Yeah, me too. It’s me giving Sea to Summit a lot of money. I don’t have a relationship with them, but they make some tip top notch stuff and I find it to be money well spent. This is camping gear for life.
Unrelated to my sleep system, I also had my AG1 in my saddlebag. I took that every morning in the form of their daily travel packs and would do that/bring them again in a heartbeat.
It is possible to do Tour Divide without a sleep system. It’s an enormous risk if you get sleepy and need a nap before you get to the next town/hotel/motel. But people have certainly pulled it off and it’s one easy way to shed a few pounds from your rig.
In my handlebar bag…
Getting to the internals of the handlebar bag is the most complicated of the bunch, so I put stuff here that I needed infrequently. As I mentioned, it was a particularly not-terribly-cold year, so I had the following items that I did not often need stored there:
wool gloves by UnTapped/DeFeet that are no longer in production
When push comes to shove, these are all things I want. If I found myself in a not-uncommon June snow squall in the Rocky Mountains at 11,000 feet, I would want all of the above. I didn’t need them, so it’s a hard thing to juggle.
I was told that dry bags aren’t the worst idea inside of theoretically waterproof bags. Much like pounding rain on the human body inside a waterproof jacket, your stuff is likely going to get wet unless it’s protected inside of other protection. Ergo, I put these aforementioned things in Sea to Summit Ultralight dry bags.
In my downtube bag…
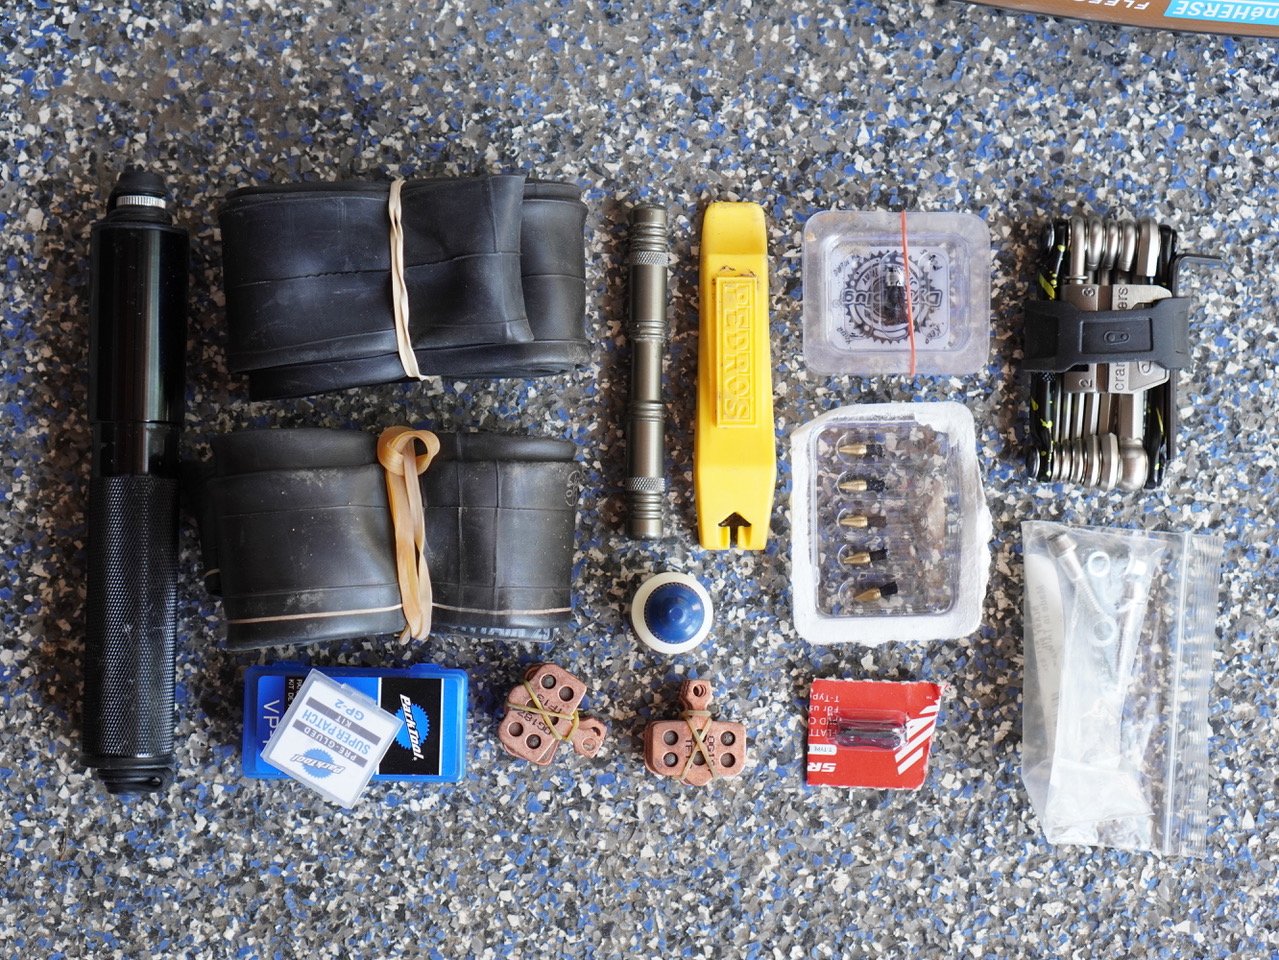
Because of the massive saddlebag there isn’t a conventional, baseball sized saddlebag in which to store tools, so I opted to put these things in the downtube bag instead. The generic title of “tools” include heavier stuff, so placing this stuff low on the bike seemed wise. It’s receiving the most punishing treatment from spray off the front wheel, but it’s stuff that can withstand it. This is the bag you don’t want to access in the first place because if you need something in it, something has gone awry.
I carried two 29” mountain bike tubes. Make sure you have the right valve length, to state the obvious. I went with pretty rugged thickness of rubber, thinking an ultralight tube is an invitation for things to go wrong.
Both an pre-glued patch kit as well as a glue + patch patch kit. I conveniently didn’t need either. Although neither kit weighs much of anything, I probably would go with just one of those in the future.
A hefty Pedros tire lever. Not a flimsy one that had 50% chance of snapping on its inaugural run.
A four-tipped, Dynaplug Racer Pro. Additionally a ton of extra plugs in both standard and thick gauge thickness.
A spare SRAM Quick-Link. Make sure you get the right link for your chain. Duh, but… duh.
Little bottle of all-condition chain lube. I feel like every event I do has Squirt as a grab bag product, so from my garage inventory of 100 trial sized bottles, I took a single one. Given that we were getting rained on every day, I quickly went through that and then bought an 8oz bottle at Great Northern in Whitefish. Starting with a bigger bottle isn’t the worst idea. Or just be aware how frequently you might see a town with a bike shop.
I opted for SRAM’s Heavy Duty brake pads because stopping a 50lb bike with a large, adult human is not something to be taken lightly.
A multi-tool isn’t something to skimp on. Making sure that all of your allen tools will reach all of the bolts on your bike is critical. I believe I have this by Crank Brothers and their longer than normal keys are helpful.
Furthermore, I brought a couple individual keys to reach certain areas that might need more frequent tinkering. I needed a 3mm allen and t-25, so I had those easily on hand as well.
Pictured above, but actually living in my frame bag is a hand pump. I could be exaggerating, but I think Lezyne makes 4,000 varieties of pumps. They’re all terrific and seen below is the Grip Drive High Volume in size medium. This is the one I’d bring again.
Lastly, pictured above and to the right is a little baggie with spare bolts to my seatpost. I read on a forum somewhere that spare bolts to one’s seatpost are important. I have reason to believe that the person who wrote that either lost or broke the bolts on their seatpost during Tour Divide. You could additionally bring a spare for every bolt on your bike that might spontaneously snap, like a seat collar or stem bolt, but that seems unnecessary. I don’t think I’ll bring this little kit on my next voyage. Just something to consider.
In my frame bag…

First and foremost, unseen here but of the highest priority, is the Velocio Anorak Rain Jacket. Alex Howes, who lives in the high Colorado Rockies, and I were talking quite a bit before the ride. He told me not to skimp on a rain jacket and that seemed like excellent advice. There are lots of rain shells, wind shells, lightweight jackets that are sweet, but the Anorak is supremely durable and waterproof. The hood is a very helpful addition, the side vent is something I loved. In the sage words of Alex Howes, “Don’t skimp on a rain jacket, Ted”.
In the bottom of my frame bag, lived my rain pants. You don’t know you need rain pants in your life until it’s somewhere in the 40-50 degree range, you’re at the top of a mountain with an hour long descent coming up, and the thunderstorm that has been looming in the distance decides that now is a lovely time to come say hello. At which point when you’re dry and warm from head to toe, you feel like a genius.
Velocio’s arm/leg/knee warmers have long been my favorite. They’re very light and very flexible, yet still quite warm. Sure, light and flexible are probably two words you use with any non-thermal warmer. Perhaps you have to trust me that these are the leaders of the pack in the arm/leg/knee warmer category. Seen upper left in the picture above are black arm and leg warmers, and directly below them are the white Velocio Sun Screens. Having just driven across the country and seen how baking hot the New Mexican sun can be, I wanted those as an ace in the hole for my skin.
One pair of bibs or two, that is the question. That’s a very hotly contested question in fact. I went with two. There are clear benefits; having clean bibs after you’ve been riding the same pair for three days and a rainstorm just soaked you to the core makes for some good livin’ when you don new bibs. There are less clear benefits, like when you check into a hotel and they offer elusive laundry service, having two pairs of bibs allow you to wear your clean pair rather than walking around the hotel in a towel like a weirdo while your other pair is being laundered.
The drawbacks of carrying extra bibs are that they take up a tiny bit of weight and a little bit of room. I vote two pairs.
I had Velocio’s Utility Bib which I are my favorite over the past few years. Additionally I brought the Velocio Concept Bib which have a different fit and different chamois which is helpful if you want to mix things up on your undercarriage for such a long adventure.
Similarly I brought two jerseys. The Concept Merino is a personal favorite during shoulder seasons or on days with big temperature swings, because wool doesn’t hang onto and broadcast stench. Additionally I brought the Ombre Ultralight. Needing two jerseys is a bit of a gamble. There are very few things that you’ll bring that are purely heavy unto themselves, but collectively things do add up. Between the two, I’d rather have spare bibs than a spare jersey.
In the category of “other clothes” include the following:
Signature Cap — worn daily, would bring again
Spare Wool Socks — two pairs of socks, would bring both again
Luxe Gloves — worn daily, would bring again
Ultralight Vest — worn daily, would bring again. It’s hard to believe the warmth provided by this foolishly light vest that crumples down into a miniature golf ball and weighs nothing
Gravel Base Layer — maximized its use, worn daily, would bring again. There are pockets on this baselayer, which is why I wore it over my bib straps. Given a shortage of real estate in general, I used the pockets plenty and think it’s a very sweet piece of gear
I packed a dry bag full of electronics, which also lived in my frame bag, containing the following:

Headlamp — probably would not bring again, but that’s a toss up
Goal Zero Flip 24 Power Bank — helpful? Yes. Necessary? No. It’s a lightweight little unit, but with some decent foresight and periodically checking in on your devices’ battery throughout the day, you don’t need this little gizmo
eTap Charger + battery — if you’re running SRAM, this is mandatory
USB 3, USB C, iPhone charging cable — mandatory, would bring all again
WHOOP — a simple system that allows you to wear and charge simultaneously
Spare 2032 batteries — shifters, power meter, heart rate monitor, you name it, this battery often powers it
GoPro — I’m working on a video of my adventure. Yes, I’d bring it again. I wouldn’t bring the spare battery though.
A first aid bag is something you really hope you never need. And chances are, the day you don’t bring it is the day you need it.
Band-Aids, neosporin, steri-strips, gauze, and small Tagiderms all contained here.

The following, let’s call them toiletries, lived in a ziplock bag in my frame bag:

Zealios Chamois Cream — I use chamois cream sparingly. Like, I use it when I have something rubbing the wrong way. Thankfully I never needed it, so this is insurance more than anything
Zealios Sun Screen — Two little travel packs are handy in a pinch, but I ended up buying a bigger bottle that was used more frequently
Kid’s Toothbrush and travel sized toothpaste — Mandatory
Floss — You’re eating sugar all day, every day, so flossing isn’t the worst idea
Small 24 count Advil/ibuprofen — Helpful, not mandatory
Ear plugs — I got these in 2009 on Cervelo Test Team. They’re custom to my ear and I would have happily paid $500 for these, given how effective and comfortable they are.
Moleskin Foam Padding — Helpful, not mandatory
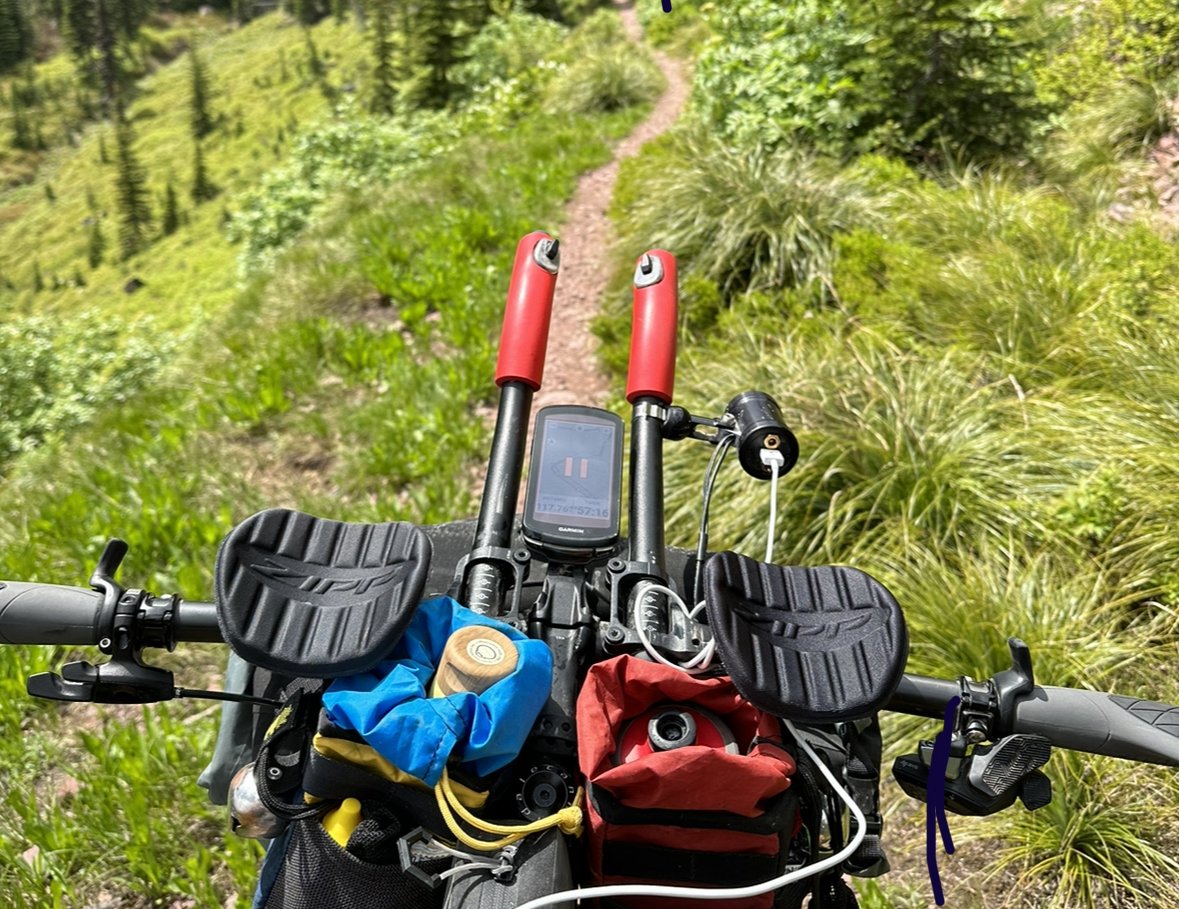
In my top tube bag…
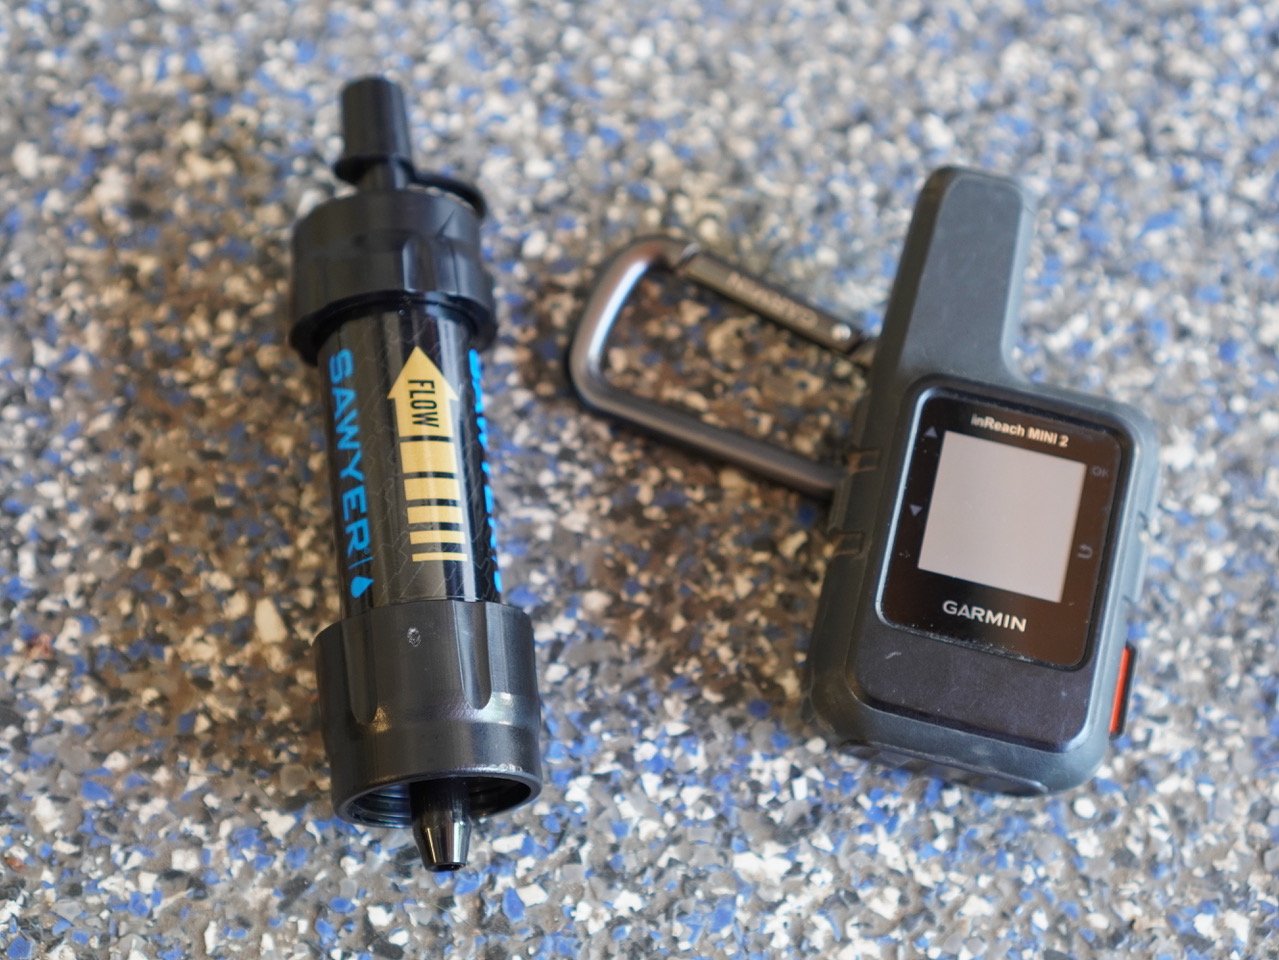
This is your easy access to tools, nutrition, and so forth. As you see in the image below, I had a Sawyer Mini filter and Garmin inReach Mini 2 (both of which are awesome and would definitely bring again, no question about it). Additionally, I put the 16oz Sawyer water bag, which can store — you guessed it — 16oz of water. Knowing there would be stretches without services like the Great Basin, I wanted the ability to store water. I’d probably have filled it and slapped it on my back, under my jersey. Weird location, but whatever works. Also, a small jar of iodine tablets. I didn’t use these often, but I figure better safe than sorrily barfing in a trench. I had my multi-tool that you see up above, listed among my cycling tools, because of easier access here than strapped beneath my downtube. A Dynaplug for easy execution. Electrolyte tabs lived in here. Salt is your friend and an electrolyte imbalance is not your friend deep in the wilderness. And whatever bag of gummy worms or candy bars fit into this area.
In my Moosepacks Feedbags…
Bear bells x 2 — one on either side. Do they work? Dunno, but in addition to my hollering out periodically when riding alone through the woods, I assume these were helpful in not seeing bears!
A “small” water bottle — Easy to grab makes you prone to drink
Bigger bottle of sunscreen — I think I have a 3oz bottle. Applying sunscreen on the fly is slightly easier said than done, FYI
Bottle of lube — I estimate it’s a 2-3oz bottle. Easy access means a quieter chain, especially in an inclement weather year
Gerber Dime multi-tool — I don’t think you’re guaranteed to need pliers along the way, but it’s pretty much guaranteed that you’ll need pliers along the way
SeaLine Waterproof Electronics Pouch — I’m split on this. I don’t think I needed it. But maybe I needed it, given how much rain we got, but didn’t notice I needed it because everything continues to work. Just remember that if you NEED ziplock bags for something, they are prone to rip
Lastly, On My Body:
Why not do a little shoe shopping in the midst of a bikepacking race? I was told to have comfortable shoes for a ride of this magnitude. I love these Quoc XC shoes, I wear them in all my off-road events of all lengths, and find them quite comfortable. I didn’t think I’d need anything more than that. It was probably somewhere in the 90 minute vertical hike up Koko Claims on day one that I discovered a cycling shoe capable of hiking is the better bet. So at Great Northern in Whitefish, I picked up these Pearl Izumis and as much as it's undoubtedly risky to try new shoes in a 2700 mile ride, this was the right move.

I proudly sport SunGod sunglasses and in particular the Airas design in their Zero Frame, which is extra light, was my go-to. I considered two lenses, but the photochromatic option is too good, providing protection in the dark of night and peak, mid-day sunlight.
As I’ve talked about above, my bibs were typically Velocio’s Utility bib, my jersey was Concept Merino, my socks were Signature Wool, on my hands were the Luxe Gloves, and upon my head was the Giro Aries helmet. An iPhone was in my pocket, Skittles at the ready, a Dynaplug Air primed for deployment, and I think that’s about it. Oh, frozen burritos defrosting in my back pocket too. Pro move.
There you have it! That’s my packing list. I’ll probably look over this 1,000 times before my next massive bikepacking adventure to continue to tweak. Hopefully it helps you. I wouldn’t make any massive changes, but there are tweaks always ready to be executed. Now go out and ride!